I pushed most of the changes in this update several days ago, but never got around to writing about them. That’s because a weird thing has happened with this project. Now, thanks to LLMs, I spend minimal time completing half a dozen project-related tasks. Back then, when I crafted a new feature or fixed a bug, I’d feel proud, and in that pride, I’d get compelled to write about it. Alas, my desire to explain the changes Claude made to the codebase as if I actually authored them has waned because nowadays, I’m not doing the development work at all—Claude is.
Writing this blog just feels like one more thing Claude should do. I’ve toyed with this idea before, but this blog feels like my last true creative stronghold on the engineering side of this project and I haven’t been able to relinquish my self-assigned task of writing out these dev logs by hand, even though I no longer get rewarded with as much sweet dopamine when I do. Anyhow, onwards with my human task….
Claude finally made it so my Instagram banner stays at a constant size relative to screen aspect rather than growing or shrinking based on display output resolution. To do this, it simply moved the banner image game object into a separate canvas, “Banner Canvas”, which has a UI Scale Mode set to Scale With Screen Size and a Screen Match Mode set to Match Height. I’m proud to announce that I fixed the manual scaling of the banner size myself by adjusting the pivot points of the banner image to match its position in the bottom right corner of the screen.
Claude added a separate post-processing layer for the particles so that the camera feed can have different effects from the particles. This was a long-tenured feature on my Tasks page, and Fable knocked it out in one shot. I’m not gonna pretend I fully understand how this feature works because, as I said before, I DIDN’T MAKE IT.
Claude explains the separate post-processing layer
Each frame:
- Particles Camera ──► its own transparent image (only layer 6) └─ post-processing from Particles Volume
- Main Camera ──► the screen (feed quad, layers 0–5) └─ post-processing from Feed Volume
- Particle Layer Composite ──► lays the particle image over the screen
- Canvas, Banner Canvas ──► debug text, banner
- Particles Camera. It’s no longer part of a stack. It’s now its own base camera that renders first (depth −1). It clears to fully transparent black, so the only non-transparent pixels in its image are particles. A new script on it, ParticleLayerCompositor, creates a screen-sized image for it to draw into and recreates it if the resolution changes. That image includes a depth buffer, which matters because of the Body Occluder below.
- Main Camera. Same feed as before, but post-processing is now on and only applies the feed’s profile. It now clears with alpha 1 instead of 0.02, for a reason explained under the Alpha Processing caveat below.
- Particle Layer Composite. A full-screen image on a screen-space canvas, set to draw below your other UI. Screen-space UI draws after a camera’s post-processing, so the particles land on top of the already-processed feed, and the feed’s effects never touch them. It uses a small new shader, EnergyBall/UIPremultipliedComposite, rather than Unity’s default UI shader. The difference is that bloom glow around the particles, which sits in the transparent area, still adds light to the feed instead of being dropped.
How each camera finds its own volume. URP picks a camera’s volumes by their layer, via the camera’s Volume Mask. I added two layers that exist only for this, with nothing ever rendered on them:
- layer 7 PP Particles: Particles Volume is on it, and only the Particles Camera’s mask includes it.
- layer 8 PP Feed: Feed Volume is on it, and only the Main Camera’s mask includes it.
One project-wide caveat: Alpha Processing
The particle image only stays transparent through post-processing because I turned on URP’s Alpha Processing setting. It’s a project-wide setting, and it limits post-processing to pixels with alpha above 0, on every camera. That’s why the Main Camera and the Dummy Scene camera now clear with alpha 1. Any new camera you add that draws to the screen will need the same.
The UX change involved adding a separate “Target” row to the in-game menu where users can flip between the two profiles.
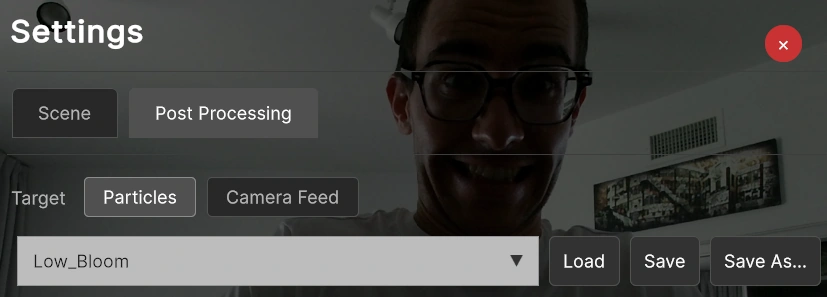
This brings me over to the next set of changes made to the project this week, which was eliminating the need to have separate profiles for the main and testing scenes. I need to take some credit for this, because even though Claude wrote the code, I gave it all the theory it needed to do it the right way.
It came down to realizing that the only real difference between main and dummy scene profiles was that dummy scene profiles had Dummy Only Mode toggled on. Well, it’s not like the main scene would ever have that toggled on, so why was it featured as a toggle in the in-game menu? I touched on this improvement briefly in my last entry. As a follow-up, I had Claude implement several more scene-specific setting gates, including hiding all Kinect-related settings from the dummy scene. On this same track, I made sure the Camera Feed target in the Post-Processing section of the in-game menu gets hidden whenever showCameraFeed is disabled.
Lastly, Claude fixed the uber-annoying bug that caused particle colors to change whenever any scene settings updated. For some reason, I used to use a OnCustomColorsChanged action—I can’t even fathom why.
So yeah, I got a lot done this week in this project, but there’s still more to do. First of all, I’d like to make the in-game menu scale with screen size like my Instagram banner does now. It seems like most of its UI components already scale, but its text does not, and at small resolutions, the menu text dominates.
Secondly, why do the particles in my main scene not behave like the ones in the dummy scene? I thought the whole ordeal of introducing autoscaling with bodyScale fixed this?!? Dammit.
The most striking difference is the absence of white particles, which is probably due to, hmm, let’s see…POST PROCESSING?
I tested this theory by reverting back to a commit before this post-processing change, and it turns out the bug is still there. My dearest Claude, I’m sorry for blaming you.
Fixed!
The bug was hidden pretty deep. The Kinect player’s game object prefab had an override that was renaming its VFX Transform Binder used to get the sphere’s position into the VFX graph from “vfxSphere” to “sphere”. I never would have found this. Or maybe I would have. All I know is that I’m so damn proud of myself for giving Claude full access to VFX graph in Unity through the CLI. It’s completely changed the way I work on this project.
Tags: claude ui post-processing urp ar philosophy