I’m preparing to merge the Sports2D and Video-Depth-Anything-Live packages. I started by running VDAL with the auto_fast.py script. On this machine (and superior webcam), I noticed a bit more choppiness in the depth viewer framerate. Out of curiosity, I googled OpenCV to see if there were any optimizations I could make to have it run quicker, and that’s when I learned that the default OpenCV package doesn’t even run on the GPU! Fortunately, plenty of setup tutorials exist for compiling the OpenCV library with CUDA support, so that’s what I’m working on now.
According to the guy in this tutorial, building the package from source will take hours. So far, OpenCV has been building for about 5 minutes, and no errors yet. I built the package for various CUDA architectures, so I’m hoping I only need to do this one time instead of on all my machines. Anyway, for documentation purposes, here are some important steps:
- I needed to install cuDNN. Installing it actually meant downloading some files and copying them into my CUDA toolkit directories. I used the description of this tutorial.
- CMAKE notified me of missing entry values during the configuration process. I was instead able to install OpenBLAS from here and NASM from here. Other libraries, however, posed issues when I tried to install them with Cygwin.
A quick GPT prompt answered my earlier inquiry. Unfortunately, NO, I cannot redistribute this source-built package across my devices, which SUCKS. However, what I can do is ensure I have the steps to build this package laid out clearly so I can repeat this process on my other machines. Here we go, folks.
-
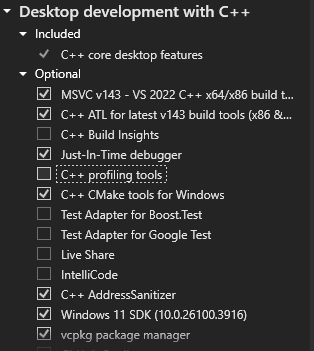
Install Visual Studio. Microsoft now enforces installing the newest version to make life harder for us developers. That means after installing VS 2022, I need to open Tools→Get Tools and Features→Individual Components→MSVC v142 - VS 2019 C++. I also need to install the ‘Desktop development with C++’ workload with these packages
-
Download OpenCV and OpenCV-Contrib repos (use tags to get matching versions) and place their extracted folders into a shared directory. Create a build folder in that directory.
-
Install CMake with GUI. Set the folders.

-
Click configure. Choose Visual Studio 2022 as the project generator and enter v142 into the “Optional toolset” field. Then hit finish.
-
Configure and add entries to CMake. Hit the “Advanced” checkbox next to “Add Entry”.
-
Add custom entries (there’s gotta be a config file somewhere I can just copy into here). Eigen is the trickiest one I had to deal with so far…
EIGEN_INCLUDE_PATH=C:/cygwin64/usr/include/eigen3/Eigen/src/Core/util
Eigen3_DIR=C:/cygwin64/usr/share/eigen3/cmake
I can determine the architecture version for my NVIDIA card using this command:
nvidia-smi --query-gpu=compute_cap --format=csv
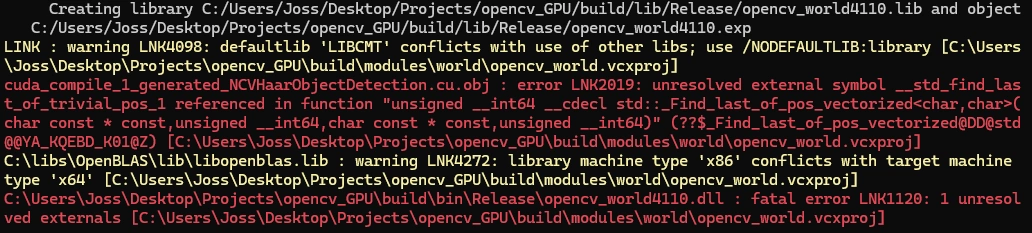
Initial build failed because of issues with the OpenCV World library.
Note for tomorrow…Research using CMAKE_PREFIX_PATH with Cygwin